Hello Octopress (and Heroku)
As of 19th Oct this site is now running on Octopress/Jekyll.
I’ve used Wordpress on and off for many years and have not entirely been happy with bulk of php used nor the editor. Rather than hating on Wordpress, this post is about how awesome Octopress is.
For a low volume and rarely changing site like this, it just isn’t necessary to have dynamic page generation at runtime. Even with caching, it is a bit of an overkill. Octopress provides slick front to a simple process in Jekyll, write something then generate a static site. Only when a new page/post is added is regeneration of the site necessary and even then it only regenerates the bits that have changed.
Posts and Pages are created from separate Markdown text files which allows one to write concisely without being too verbose in the layout of text. There’s plenty of Markdown out there in the world, here are some reasonable references:
- greg.vario.us/doc/markdown.txt
- stackoverflow.com/editing-help
- and also Daring Fireball post from way back that is somewhat the official reference
The Octopress site provides straight forward instructions to configuring things and creating a new post is as simple as rake new_post[“My Post Title”].
Setting Up
I haven’t really delved into the Ruby world much before so it was a bit of a learning exercise.
There is a great guide in http://blog.zerosharp.com/setting-up-octopress-on-windows that will get one up and going pretty quickly, although I’m still not really any more knowledgable about Ruby, running rake and yari commands are about it. Yari really makes this bit easy.
Once you’ve followed that guide you should be good to start writing something useful.
Write Something
A new Post is created by simply running the command:
rake new_post["My Post Title"]This will produce a new file in the source/_posts directory named in the form of yyyy-mm-dd-title.markdown.
Editing the produced file and putting a published: false property in the header will keep it out of the generated site (but still visible in the preview).
A new Page is similar:
rake new_page["About"]But in this case it will produce a new directory “about” in the source directory which will contain an index.markdown file.
Deploying to Heroku
Once you’ve got your site installed, written something, previewed and generated it, you need to put it somewhere. Heroku is a great choice.
The Octopress site has a really easy to follow guide on deploying to Heroku here. If you follow that, you’ll be almost done.
DNS Configuration
The last thing that I had to actually play around with (some trial-and-error, plus some luck) was configuring the custom domain. I actually really like the Heroku style of default naming your app in the style of whispering-swan-2831 rather than say pg8685432326 in the case of Linode (also a great service!), but it isn’t quite as memorable for your visitors as an actual domain name.
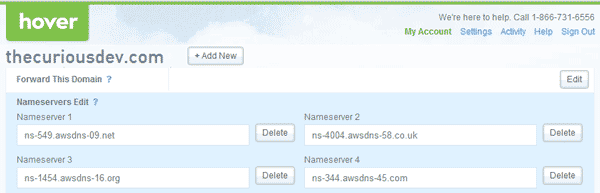
In my case, I decided to go with Amazon’s Route53 and pointed my domain’s nameservers from Hover.com to the 4 that were provided in my Route53 configuration.
In Route53, you will then need to add the WWW CNAME and point that to your whispering-swan-2831.herokuapps.com address.
To have a so-called “naked” domain without the WWW, you need to then also add the 3 IPs listed on Heroku’s Dev Centre, it isn’t suggested, but it’ll work for me, like so:

After a couple hours (maybe 24) of somewhat impatient waiting and hoping the configuration is correct you should then see your shiny new site at your domain.
As a bonus, I also configured static.thecuriousdev.com to point to Amazon CloudFront, as per my post on static website performance tuning.